Reporting > Dashboard Builder | Quick Links
1. Overview
Quick Links widgets in Dashboards allow users to create dynamic buttons that direct them to a specific page within WHS Monitor or to a page outside of the system. They act as bookmarks or favourited pages, pointing users to key forms and registers without needing to use the side navigation bar.
This article explains how to add and configure Quick Links, including creating custom quick links that direct users to specific URLs.
2. Who is this for?
- System Administrators
- Managers and Supervisors configuring dashboards
- Users who want quick access to frequently used modules
- Individuals who have permission to customise dashboards
3. Prerequisites
- Active account and login credentials
- Access to Dashboard Builder
- Permission to edit dashboards
4. Step-by-step instructions
Navigation
- On the left-side navigation bar, select Reporting > Dashboard.
- Select the relevant dashboard by selecting the three vertical dots and selecting Switch Dashboard.
Creating a Quick Link
Use an Existing Link
- Select Add Widget.
- Select tab Custom Widgets and select Dashboard Quick Links.
- Hover the cursor over the new widget and select the pencil icon.
- Enter the Widget Name - This will be the name of the widget that will appear on the Dashboard. Note: This field is not mandatory and can be left blank. This widget type can also be used to create headings and add images to a Dashboard without needing to add in quick links.
- Click on Quick Links and select the links to add to the Dashboard.
- Click Save to save the changes and click Close to return to the Dashboard.
Save Widget will add the configured widget to the Saved Widgets library.
Custom Links
- Select Add Custom Link.
- Complete the following fields for each quick link:
- Name - This will be the name of the button that will appear on the Dashboard.
- URL - Copy and paste the URL of the page that the user will be directed to.
- Icon - Select an icon to display on the left hand side of the name. Note: This is not a mandatory field.
- Shadow - Adds a shadow to the quick link.
- Border - Underlines the link name. Only applicable for type 1 widgets with multiple links.
- Background Colour - Select the background colour of the button.
- Font Colour - Select the font colour of the button.
- Click Save to save the custom quick link.
- Click Save to save the entire widget.
Appearance
Card Configuration
- Background Colour - Updates the colour of the widget background.
- Font Colour - Updates the colour of the widget name.
Link Configuration

These settings are only applicable if there are multiple links in a single widget.
The following settings are only applicable for Type 1 quick link widgets which have multiple links.
- Number of Columns - Set the amount of columns to appear horizontally across the page.
- Width
- Auto - The width of the link will be the size of the text in the name.
- 100% - The width of the link will be the size of the column.
- Alignment - The alignment of the text. This is only applicable for links which have the width set as 100%.
- Padding X - Adds blank space horizontally on the inside of the link.
- Padding Y - Adds blank space vertically on the inside of the link.
Editing Quick Links
Data Display Settings
From this section, users can reorder, edit and delete quick links.
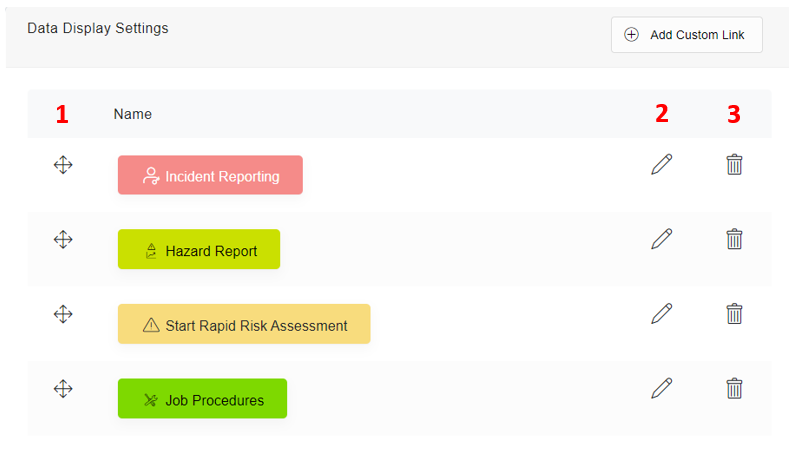
- Reorder - Click and drag the links to reorder them.
- Edit - This icon will allow users to update the link.
- Name - This will be the name of the button that will appear on the Dashboard.
- URL - Copy and paste the URL of the page that the user will be directed to.
- Icon - Select an icon to display on the left hand side of the name. Note: This is not a mandatory field.
- Shadow - Adds a shadow to the quick link.
- Border - Underlines the link name. Only applicable for type 1 widgets with multiple links.
- Background Colour - Select the background colour of the button.
- Font Colour - Select the font colour of the button.
- Once the changes have been made, clicking Update will save the changes.
- Delete - This icon will remove the quick link.
- Click Save to save the changes and click Close to return to the Dashboard.
Save Widget will add the configured widget to the Saved Widgets library.
5. Expected Results
- Quick Links appear on the dashboard
- Users can access key modules with a single click
- Custom links direct users to specific pages or resources
- Dashboards become faster and easier to navigate
6. Related Articles and Resources
- Creating a dashboard
- Setting a Default Dashboard
- Dashboard_Reporting on Risk/Incident Modules
- Dashboard_Datasources for Widgets
- ▶ Reporting > Dashboard | How to Simplify the WHS
Monitor Experience
- ▶ Reporting > Dashboard | Module Overview
- ▶ Reporting > Dashboard |
Configuration & Management as Administrator
7. Troubleshooting & FAQs
| Issue | Cause | Solution |
| Updating the quick links didn't update the Dashboard. | The widget may not have been saved correctly or there may be a slight delay after the changes have been made. | 1. Ensure that the quick links widget was saved. 2. Refresh the page. 3. Sync the Dashboard. |
| Some settings don't appear to be doing anything. | Some settings are applicable to specific types or are based on the number of links. | Check the notes in the article. If the issue persists, submit a support ticket. |
Error message: Please enter a URL that includes http or https | The URL is missing HTTP or HTTPS. | Update the URL to include https:// at the start |
| Can't find the URL for a specific page | Not all WHS Monitor modules are listed under the library of links. | Open the page in a new tab in the browser. Click on the web address and copy this into the URL. |
Article Last Updated : 19.06.2026
Related Articles
🗋 Compliance > Documentation > Policies | Approving a Procedure or Policy
1. Overview Users can digitally sign and approve Policies and Procedures within WHS Monitor. This ensures documents are reviewed, authorised, and compliant with organisational requirements. This article explains how to add a signature to a document ...